Anyways, today I am going to provide a tutorial on how to ship books securely without having to pay for any packaging materials except for tape. I often hate it when my books arrive in an undesirable state due to bad packaging and the postal service's careless handling. This guide will help prevent most damage done by the post office and rainy weather.
Step 1: Raid your local post office of its free supplies.
You're looking mainly to get your hands on the free 12.5" x 9.5" cardboard envelopes and the Tyvek envelopes.
They look like this
Or, you can visit your domestic post office's website to order the supplies for free. Here are the links to get the above materials from the United States Postal Office.
Express Mail Flat Rate Envelope
Express Mail Tyvek Envelope
Step 2: Take apart one of the 12.5" x 9.5" cardboard envelopes
Step 3: Flip over the cardboard so that the colored side is facing you
Step 4: Take your book and line it up to the already creased edge
Step 5: Mold the cardboard to the shape of the book
Step 6: Remove the book and crease the new edges so that they can be more defined
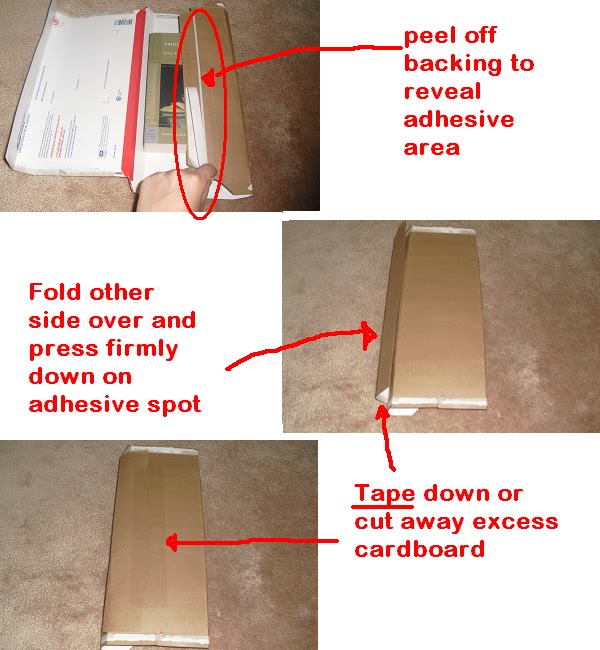
Step 7: Place the book back on the cardboard. Make sure the side with the adhesive strip is under the non-adhesive strip side when folding the sides back into place.
Step 8: Peel off the adhesive backing, fold the other side over on top of the adhesive side, and press firmly down. Either cut off or tape down excess cardboard.
Step 9: If you have excess cardboard on the sides with the openings, trim it away so that you can more easily fold them down later. A good way to determine how much to cut away is to think about whether or not two-thirds of the book is covered when folding one side over.
Step 10: At the opening, cut along all four creases until you hit the four corners of the book
Step 11: You should now have four flaps. Fold down the smaller flaps then fold down the larger ones. Make sure when you're folding the flaps down that the creases are snug against the edges of the book.
Step 12: Stick one piece of tape over the top flap and press firmly down.
Step 13: Repeat Steps 9-12 on the other opening. In the end, you should have something that looks similar to this

.................................................................................
You can stop now, or you can continue on to water proof your package
.................................................................................
Step 14: Take a Tyvek envelope and cut along all the sides so that you have two separate pieces. One with the writing all over it, the other with a blank side. Toss away the side with the writing. In case your book is too big or you're packaging more than one book together, you may have to cut up multiple tyvek envelopes and tape them together.
Step 15: Flip the tyvek sheet over so that the colored side is facing up and then fold the sides toward the middle. The blank side should now be facing you. Tape down the side that is on top.
Step 16: At one of the openings, fold the shorter sides inward so that the longer sides now look similar to a triangle. Afterwards, fold the longer sides down. Cut off or fold any excess tyvek that sticks out.
Step 17: Tape down the top longer flap
Step 18: Repeat Steps 16 and 17 on the other opening. You are now finished!


4 comments:
hi, i thought u cant use those envelopes for anything other than usps shipping? It says on the sides, thats why i never took them apart.
That's true, but flipping the envelopes inside out so that the usps labels aren't showing allows you to use them for any type of shipping.
I have been turning the tyveks inside out and just folding them over so that the print doesn't show.
I wonder if FedEx tyvek shippers have printing on the inside?
Will they let us have them for free?
Hmmm... Time to go visit a Kinko's
Nice post. Well what can I say is that these is an interesting and very informative topic on flat rate shipping envelope
Post a Comment